Site maintenance (Drupal, DIY)

Uit De Vliegende Brigade
Versie door Jeroen Strompf (overleg | bijdragen) op 31 okt 2016 om 06:50 (→‎Upload & use a file)
(wijz) ← Oudere versie | Huidige versie (wijz) | Nieuwere versie → (wijz)
Naar navigatie springen Naar zoeken springen

This article discusses several common maintenance tasks that you might come across when managing a Drupal 7 web shop.

Log in as administrator

Before you can do any maintenance work, you first have to log in with your administrator account. This can be done in several ways:
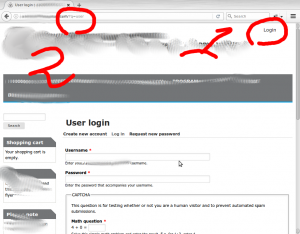
Usually, somewhere there is a link called Login, Account, Members or something along those lines. In this case, it's the link Login at the top right corner of the home page
Alternatively, you can reach the User login-page by adding ?q=user to the site's address. E.g., if your site is called http://example.com, the address of the login page would be http://example.com/?q=user

Add a page

Drupal is a content management system, meaning that it makes it easier to manage content, add pages, etc. In Drupal parlance, a page is a more-or-less statical piece of content. E.g., the Contact page or About us page. How to add a page:

Choose Content » Add content » Basic page
A teaser is the short introduction to an article, that appears on the front page of the site. Usually, teasers are just the first few lines of the article and are automatically generated. However, you can also write the teaser yourself. In that case, click Edit summary, and a text area appears for entering the teaser
Check the item Provide a menu link for creating a link to this item from the site's main menu. Without such a link, visitors to the site wouldn't be able to find the page through the menu
Click Publishing options and check Promoted to front page. Now the teaser will be added to the front page

Change order on home page

The home page usually containts teasers: Short introductions to a page. These teasers are sorted by publication date, and the easiest way to change the order, is by changing the publication date. As an example:

We have two teasers: One starting with the letters CON, and the other called Frequently asked questions. Let's change their order
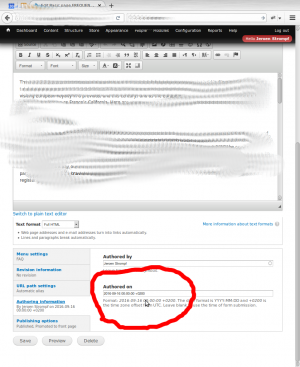
After being logged in as Administrator, hoover over the top-right corner of the Frequently asked question block, until the gears icon appears. Click it, choose Edit, and scroll to the item Authoring information at pretty much the bottom of the page. Click it, and change the date at Authored on - Give it a more recent date. You can even give it a date in the future. The more recent stuff is put on top
The end result: The block Frequently asked questions now appears above the other block

Change prices

Let's discuss various ways to manually change the prices of products on your site.


Method 1: Through the gears icon

Probably the easiest way to update prices on your site, although it may not always work:

Navigate to the desired product. Click on the gears icon that appears when you hoover over the product, and choose Edit. Naturally, this icon will only appear when you're logged in. You can easily see if you're logged in, because of the black bar at the top that only appears when logged in
Scroll through the page until you see the currency amount. Change it, scroll further down, and clik on Save. Please note that this page can look quite differently, and often, prices are actually not accessible in this way. If that's the case: See method 2 (below)

Method 2: Through the menu

A way to change prices which is a bit less intuitive, but more robust:

At the black menu at the top, use Store » Product » All product variations. Select your product. Click Edit, change the price, and click Save

Upload & use a file

Uploading a file and subsequently using that file in a posting, is a bit convoluted, but nothing that you can't do:

Uploading a file

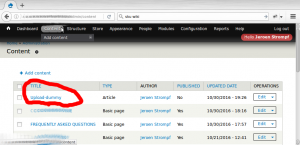
Go to Content, find item Upload-dummy, and click Edit
Scroll down to Add a new file. Click Browse, select a file, and choose Upload
I've now uploaded a file named Flier-2016.07.31.pdf. In order to use it, I need to know its URL: Click with the right mouse button on the file, and select Copy link location

Use the file

In order to make the file available for site visitors, we have to do something useful with the URL that we just genererated. Here's an example:
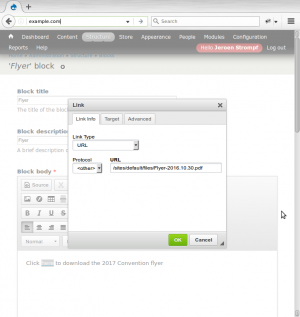
This block contains a link to a file. I want to update this link, to point to the newly uploaded file. Click on the gear icon, and select Edit
Right-click on the link, and select Edit link. Now this dialog box appears. The old link is /sites/default/files/Flyer-2016.10.30.pdf. Replace this with the URL that we copied to the clipboard. This will be something like http://example.com/sites/default/files/Flyer-2016.07.31.pdf. That will be just fine. However, if you shorten this to /sites/default/files/Flyer-2016.07.31.pdf that would be even slightly better (it makes the site a tiny bit faster, and if you ever move the site from e.g., example.com to something else, this link will still be functioning. However, if such a subtlety is lost on you: just ignore this!). Done? Close the dialog box, and scroll to the bottom of the page to safe the result